Homemade Greek Baklava: Your Guide to Restaurant-Quality Dessert
Imagine a culinary escape to the sun-drenched shores of Greece, right from your own kitchen. This isn't just a fantasy; it's the promise of an authentic Greek baklava recipe. Far from being an intimidating dessert reserved for skilled chefs, creating restaurant-quality baklava at home is a surprisingly achievable and immensely rewarding endeavor. With layers of perfectly crisp phyllo pastry, a rich, aromatic nut filling, and a generous drenching of fragrant honey syrup, each bite is a symphony of textures and flavors. It’s a show-stopping treat that transforms ordinary moments into special occasions, perfect for entertaining guests or simply indulging yourself after a long day. If you've been searching for that definitive homemade baklava recipe, your sweet journey starts here.
The Allure of Authentic Greek Baklava
Baklava (pronounced "bah-klah-vah," with the stress on the first syllable) is more than just a dessert; it’s a celebration of tradition and taste. While its exact origins are debated by food historians, it has become synonymous with Greek cuisine, adorning dessert tables at family gatherings and gracing the menus of fine dining establishments. This sweet, rich pastry is beloved for its contrasting textures – the shattering crispness of the phyllo giving way to the tender, spiced nuts, all enveloped in a sticky, sweet honey glaze. Many associate it with heartwarming memories, a testament to its comforting and indulgent nature.
What makes a truly exceptional baklava recipe? It's the harmonious balance of high-quality ingredients and meticulous technique. Don't be fooled into thinking it's overly complicated; this traditional pastry is surprisingly approachable for home bakers, even beginners. With a little patience and our detailed guide, you'll be able to recreate that irresistible taste and texture found in the best Greek restaurants, right in your own kitchen.
Essential Ingredients for Your Baklava Masterpiece
Crafting the perfect baklava begins with understanding the role each ingredient plays. Each component contributes to the dessert's signature taste, texture, and aroma.
*
Phyllo Dough: The Foundation of Flakiness
* This tissue-thin pastry is the heart of baklava. For its signature flaky texture, it *must* be properly thawed. We recommend thawing it overnight in the refrigerator, then letting it come to room temperature for about an hour before use. This makes it pliable and less prone to tearing. Always keep unworked sheets covered with a damp towel to prevent them from drying out, which can lead to cracking.
*
Butter & Olive Oil: The Golden Elixir
* Unsalted butter is key for richness and a beautiful golden, crispy finish. We mix it with a touch of olive oil not just for deeper flavor, but also because olive oil contributes to the overall moisture content, ensuring the phyllo doesn't become brittle too quickly. This blend helps achieve that perfect crisp-yet-tender layering.
*
The Nut Filling: Aromatic & Crunchy
* A traditional baklava recipe typically features a blend of almonds and walnuts. Almonds provide a delicate richness and crunch, while walnuts contribute a classic, robust flavor. We'll be using both for a balanced, authentic taste.
*
Ground Breadcrumbs: The Secret Absorber
* A small amount of ground breadcrumbs (plain, not seasoned) is a clever addition. They absorb excess moisture from the nuts and butter during baking, helping to maintain the filling's texture and preventing the baklava from becoming soggy at the bottom.
*
Sugar: Sweetening the Core
* Just enough granulated sugar mixed into the nuts enhances their natural sweetness without overpowering the final honey syrup.
*
Spices: The Soul of Greek Baklava
* Ground cinnamon is non-negotiable, infusing warm, comforting notes that are quintessential to Greek baklava. Ground cloves add a distinct, pungent spice that beautifully complements the cinnamon and nuts, providing depth and complexity to the flavor profile.
*
The Honey Syrup: The Sweet Drench
* This sweet glaze is what binds all the layers together and provides baklava's iconic sticky finish.
*
Sugar & Water: The Base
* These form the foundation of the syrup, creating the perfect consistency for absorbing into the phyllo.
*
Honey: The Authentic Touch
* Opt for a good quality honey. It’s the star here, providing deep, floral richness and that unmistakable authentic taste.
*
Fresh Lemon Juice: Balance and Brightness
* Crucial for two reasons: it balances the intense sweetness of the syrup, adding a refreshing brightness, and perhaps even more importantly, it helps prevent the sugar in the syrup from crystallizing, ensuring a smooth, clear glaze.
*
Cinnamon Stick: Infused Warmth
* Cooking the syrup with a cinnamon stick infuses it with an extra layer of warmth and aromatic complexity, enhancing the overall sensory experience.
With these carefully selected ingredients, you’re well on your way to whipping up a batch of authentic Greek Baklava that is sure to bring smiles and delight.
Step-by-Step Guide to Crafting Perfect Baklava Layers
Making baklava is a process that builds anticipation layer by layer. Follow these steps carefully for success.
1. Preparation is Key
- Thaw the Phyllo: As mentioned, thaw phyllo dough overnight in the refrigerator, then let it sit at room temperature for at least 30-60 minutes before you start. This makes it much easier to handle without tearing.
- Preheat Your Oven: Set your oven to a low 150°C (300°F). A lower temperature is vital for baklava; it allows the phyllo to crisp up gradually and evenly, turning golden brown without burning.
- Prepare Your Pan: You'll need a 9x13-inch baking pan. Brush the bottom and sides generously with your melted butter and olive oil mixture.
2. The Aromatic Nut Filling
- Chop the Nuts: Finely chop the almonds and walnuts. A food processor works wonderfully for this, but be careful not to over-process them into a paste; you want a fine, crumbly texture with some small pieces for crunch.
- Combine Ingredients: In a bowl, mix the chopped nuts with the ground breadcrumbs, sugar, ground cinnamon, and ground cloves. Stir until everything is well blended and fragrant. This mixture forms the heart of your baklava.
3. Assembling the Layers: The Art of Baklava
- Prepare Phyllo Sheets: Unroll your thawed phyllo dough. Lay it flat and use the bottom of your baking pan as a guide to trim the sheets to fit perfectly. Immediately cover the stack of unused phyllo with a slightly damp, clean kitchen towel to prevent it from drying out, which happens very quickly.
- The Base Layers: Place one sheet of phyllo in the prepared baking pan. Brush it lightly but thoroughly with your melted butter and olive oil mixture. Repeat this process for five more sheets, so you have a base of six buttered phyllo layers. Ensure each layer is brushed right to the edges.
- First Nut Layer: Sprinkle a generous, even amount of your spiced nut filling over the sixth phyllo layer.
- Continue Layering: Place two more phyllo sheets on top of the nut layer, brushing butter between them. This creates a thin, crisp separation. Sprinkle another layer of nuts. Continue this pattern of 2 buttered phyllo sheets followed by a nut layer, until you’ve used most of your nut mixture. The exact number of layers depends on how much phyllo you have, but typically you'll have 3-4 nut layers in the middle.
- The Top Layers: Once your nut filling is used, finish the baklava with at least six more phyllo sheets, brushing butter between each one, just like the base layers. Ensure the top layer is very well buttered.
- Pre-Cutting is Crucial: Before baking, use a sharp knife to carefully cut the baklava into desired shapes – traditional diamonds, squares, or triangles. Do not cut all the way through to the bottom; cut just deep enough to score the top layers. This step is vital as it allows the syrup to penetrate all the layers evenly after baking, and makes it much easier to serve later.
4. Baking for Golden Perfection
- Bake Slowly: Place your pan in the preheated 150°C (300°F) oven. Bake for approximately 60-90 minutes, or until the top is deeply golden brown and the edges are crispy. If you notice it browning too quickly, you can loosely tent it with foil. The low, slow bake ensures every layer is cooked through and crisp.
- Cool Slightly: Once baked, remove the baklava from the oven and let it cool on a wire rack for about 10-15 minutes while you prepare the syrup.
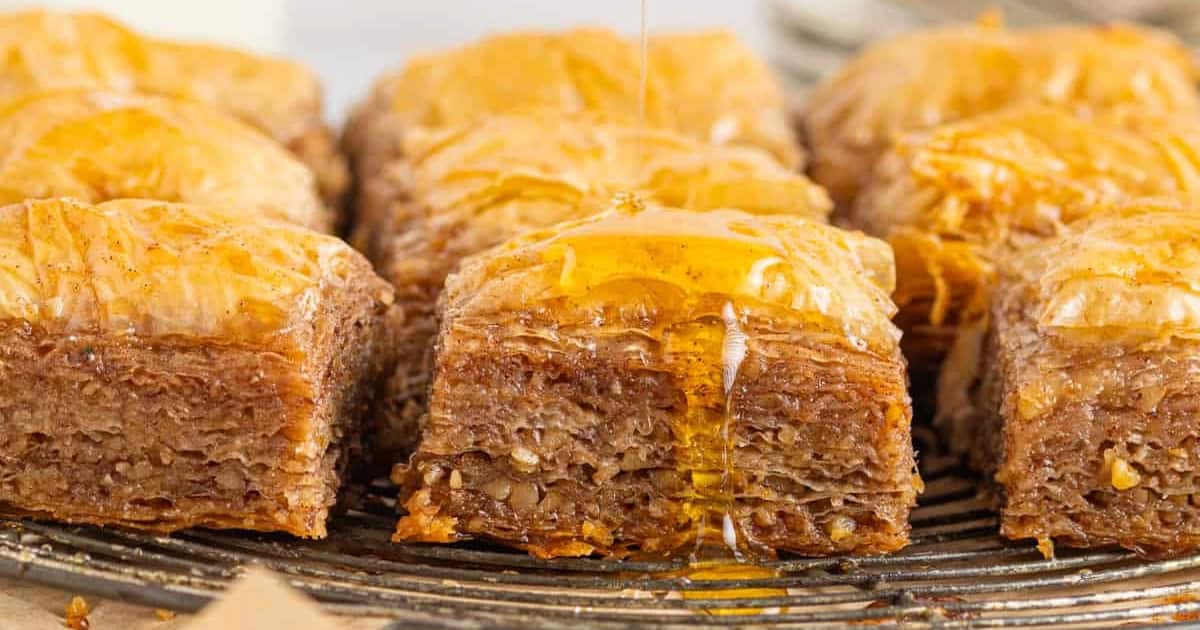
5. The Golden Pour: Syrup Application
- Prepare the Syrup: While the baklava bakes, combine sugar, water, honey, lemon juice, and a cinnamon stick in a saucepan. Bring to a boil, then reduce heat and simmer for 10-15 minutes until it slightly thickens into a glossy syrup. Remove the cinnamon stick.
- The Crucial Temperature Contrast: For crispy baklava, the general rule is to pour *cool* syrup over *warm* baklava, or *warm* syrup over *cool* baklava. The thermal shock helps maintain crispness. We recommend pouring the warm (but not scalding hot) syrup over the slightly cooled baklava.
- Pour Evenly: Slowly and evenly ladle the syrup over the entire surface of the pre-cut baklava. You'll hear a satisfying sizzle. The cuts you made earlier will guide the syrup down into all the layers.
- Allow to Absorb: Let the baklava sit at room temperature for several hours, ideally overnight, allowing all the syrup to be fully absorbed and for the flavors to meld beautifully. This patience is rewarded with perfect texture and taste.
Tips for Baklava Success and Customization
*
Don't Rush the Thawing: Improperly thawed phyllo is prone to tearing, making assembly frustrating. Plan ahead!
*
Keep Phyllo Covered: Always keep unused phyllo sheets covered with a slightly damp towel. They dry out incredibly fast.
*
Butter Generously: Don't skimp on the butter mixture between layers. This is key to the flakiness and golden color.
*
Even Cuts: Pre-cutting with a very sharp knife is vital. Wipe the blade clean between cuts for a cleaner finish.
*
Experiment with Nuts: While almonds and walnuts are traditional, you can also try adding pistachios for a vibrant green color and different flavor profile, creating inventive spins like
Easy Greek Baklava Recipe: Achieve Perfect Flaky Honey-Nut Layers.
*
Spice Variations: A pinch of nutmeg or cardamom can add another layer of aromatic complexity if you're feeling adventurous. Some even explore options like chocolate baklava rolls for a modern twist.
*
Storage: Store baklava at room temperature in an airtight container for up to 1-2 weeks. It actually tastes better a day or two after it's made, once the flavors have fully melded. Do not refrigerate, as this can make the phyllo soggy.
*
Serving Suggestions: Baklava is delicious on its own, perhaps with a strong Greek coffee, or as part of a larger dessert platter.
Making baklava is a labor of love, but it’s a surprisingly easy baklava recipe once you get the hang of working with phyllo. The joy of presenting a tray of homemade, golden, syrupy baklava to friends and family is unmatched. For more in-depth techniques and advanced tips on working with phyllo and achieving that perfect balance, check out
Mastering Greek Baklava: Flaky Phyllo, Spiced Nuts & Honey Syrup.
Your Culinary Adventure Awaits
There’s something incredibly satisfying about creating a dessert that not only tastes incredible but also evokes a sense of tradition and celebration. This comprehensive baklava recipe is designed to empower you to create a truly restaurant-quality dessert in your own kitchen. From the meticulous layering of crisp phyllo to the rich, spiced nuts and the fragrant honey syrup, every component plays a vital role in this iconic Greek pastry. So, roll up your sleeves, gather your ingredients, and embark on this sweet journey. The result will be a show-stopping treat that delights the senses and promises a mini vacation to Greece with every bite. Enjoy the process of creating this beloved dessert – you're about to impress everyone, including yourself!